Connectivity Software User's Guide and Reference
Rapid Toolkit for Sparkplug Push Data Provision Model
Rapid Toolkit for Sparkplug > Concepts > Developing Sparkplug Edge Nodes > Rapid Toolkit for Sparkplug Data Provision And Consumption Models > Rapid Toolkit for Sparkplug Push Data Provision Model
In This Topic

General

In the push data provision model, you write an independently running code that gathers the data from the underlying system and stores (pushes) it into the Sparkplug metrics. Rapid Toolkit for Sparkplug then simply uses this data whenever the data needs to be published to Sparkplug (it does so by checking for data that have changed periodically).

Rapid Toolkit for Sparkplug retrieves the data (for Sparkplug publishing) from the ReadData Property of the metric object. The task of your code is to store the data into this property, using the UpdateReadData Method. When and how it is done is up to you, and depends highly on the specifics of the Sparkplug edge node you are developing, and its devices. In many cases, it can be based on some kind of periodic timer. In other scenarios, it may be triggered by the underlying system or connected device.

When the push data provision model is used, it cannot be guaranteed that the data published to Sparkplug is "up to date", i.e. collected at the time it is published. This is because there is effectively a "cache" in the form of the ReadData Property in the metric object between the underlying system and the eventual contents of the Sparkplug that gets published, and the requests are fulfilled from the cache, and not by actually reading from the underlying system at that moment. The push data provision model can therefore be only used in applications where this behavior does not pose a problem.

Conversely, the advantage of the push data provision model is that the timing of periodic publishing to Sparkplug can be easier made more regular, as the code that retrieves the data from the underlying system cannot "block" the publishing loop.

The following picture illustrates how push data provision model works.

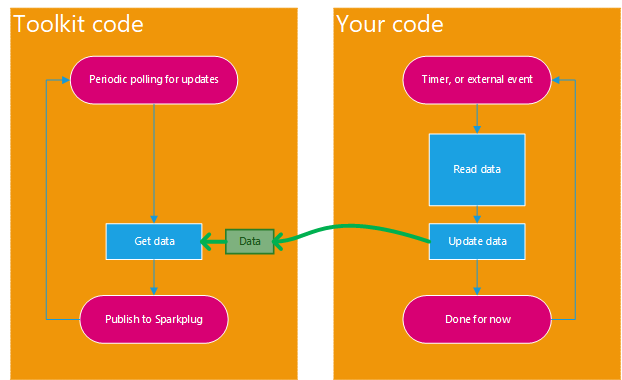
Only the data that have changed are included in the Sparkplug payload and published. This logic is implemented internally in Rapid Toolkit for Sparkplug.

.NET

// This example shows how to update the read value in the push data provision model. In this model, your code pushes the
// data into the edge node or device, and the edge node or device then makes the data available over Sparkplug.
//
// You can use any Sparkplug application, including our SparkplugCmd utility and the SparkplugApplicationConsoleDemo
// program, to subscribe to the edge node data. 
//
// Find all latest examples here: https://opclabs.doc-that.com/files/onlinedocs/OPCLabs-ConnectivityStudio/Latest/examples.html .
// Sparkplug examples in C# on GitHub: https://github.com/OPCLabs/Examples-ConnectivityStudio-CSharp .
// Missing some example? Ask us for it on our Online Forums, https://www.opclabs.com/forum/index ! You do not have to own
// a commercial license in order to use Online Forums, and we reply to every post.

using OpcLabs.EasySparkplug;
using System;
using Timer = System.Timers.Timer;

namespace SparkplugDocExamples.EdgeNode._SparkplugMetric
{
    class UpdateReadData
    {
        static public void Main1()
        {
            // Note that the default port for the "mqtt" scheme is 1883.
            var hostDescriptor = new SparkplugHostDescriptor("mqtt://localhost");

            // Instantiate the edge node object and hook events.
            var edgeNode = new EasySparkplugEdgeNode(hostDescriptor, "easyGroup", "easySparkplugDemo");
            edgeNode.SystemConnectionStateChanged += (sender, eventArgs) =>
            {
                // Display the new connection state (such as when the connection to the broker succeeds or fails).
                Console.WriteLine($"{nameof(EasySparkplugEdgeNode.SystemConnectionStateChanged)}: {eventArgs}");
            };

            // Create a read-only data metric.
            var metric = SparkplugMetric.CreateIn(edgeNode, "ReadThisMetric")
                .ValueType<int>()
                .Writable(false);

            // Create a timer for pushing the data to the metric. In a real edge node or device, the activity may also come
            // from other sources.
            var timer = new Timer
            {
                Interval = 1000,    // 1 second
                AutoReset = true,
            };

            // Set the read data of the metric to a random value whenever the timer interval elapses.
            var random = new Random();
            timer.Elapsed += (sender, args) => metric.UpdateReadData(random.Next());
            timer.Start();

            // Start the edge node.
            Console.WriteLine("The edge node is starting...");
            edgeNode.Start();

            Console.WriteLine("The edge node is started.");
            Console.WriteLine();

            // Let the user decide when to stop.
            Console.WriteLine("Press Enter to stop the edge node...");
            Console.ReadLine();

            // Stop the edge node.
            Console.WriteLine("The edge node is stopping...");
            edgeNode.Stop();

            Console.WriteLine("The edge node is stopped.");

            // Stop the timer.
            timer.Stop();
        }
    }
}
' This example shows how to update the read value in the push data provision model. In this model, your code pushes the
' data into the edge node or device, and the edge node or device then makes the data available over Sparkplug.
'
' You can use any Sparkplug application, including our SparkplugCmd utility and the SparkplugApplicationConsoleDemo
' program, to subscribe to the edge node data.
'
' Find all latest examples here: https://opclabs.doc-that.com/files/onlinedocs/OPCLabs-ConnectivityStudio/Latest/examples.html .
' Sparkplug examples in C# on GitHub: https://github.com/OPCLabs/Examples-ConnectivityStudio-CSharp .
' Missing some example? Ask us for it on our Online Forums, https://www.opclabs.com/forum/index ! You do not have to own
' a commercial license in order to use Online Forums, and we reply to every post.

Imports OpcLabs.EasySparkplug
Imports Timer = System.Timers.Timer

Namespace Global.SparkplugDocExamples.EdgeNode._SparkplugMetric
    Class UpdateReadData
        Public Shared Sub Main1()
            ' Note that the default port for the "mqtt" scheme is 1883.
            Dim hostDescriptor = New SparkplugHostDescriptor("mqtt://localhost")

            ' Instantiate the edge node object and hook events.
            Dim edgeNode = New EasySparkplugEdgeNode(hostDescriptor, "easyGroup", "easySparkplugDemo")
            AddHandler edgeNode.SystemConnectionStateChanged,
                Sub(sender, eventArgs)
                    ' Display the new connection state (such as when the connection to the broker succeeds or fails).
                    Console.WriteLine($"{NameOf(EasySparkplugEdgeNode.SystemConnectionStateChanged)}: {eventArgs}")
                End Sub

            ' Create a read-only data metric.
            Dim metric = SparkplugMetric.CreateIn(edgeNode, "ReadThisMetric") _
                .ValueType(Of Integer)() _
                .Writable(False)

            ' Create a timer for pushing the data to the metric. In a real edge node or device, the activity may also come
            ' from other sources.
            Dim timer = New Timer With
            {
                .Interval = 1000, ' 1 second
                .AutoReset = True
            }

            ' Set the read data of the metric to a random value whenever the timer interval elapses.
            Dim random = New Random()
            AddHandler timer.Elapsed, Sub(s, a) metric.UpdateReadData(random.Next())
            timer.Start()

            ' Start the edge node.
            Console.WriteLine("The edge node is starting...")
            edgeNode.Start()

            Console.WriteLine("The edge node is started.")
            Console.WriteLine()

            ' Let the user decide when to stop.
            Console.WriteLine("Press Enter to stop the edge node...")
            Console.ReadLine()

            ' Stop the edge node.
            Console.WriteLine("The edge node is stopping...")
            edgeNode.Stop()

            Console.WriteLine("The edge node is stopped.")

            ' Stop the timer.
            timer.Stop()
        End Sub
    End Class
End Namespace


Initial Data

When using the push data provision model, in general, you are responsible for providing the initial contents of the ReadData Property. Make sure you have a reasonable contents even before your code first gets a chance to push the "real" data to the metric. WIthout further configuration, the ReadData Property contains empty data - meaning that there is no timestamp, and the value itself is null. This may not be what you want - especially with non-nullable data types where null is not even a valid value for the data type of your metric; a conversion error occurs in such case, see Rapid Toolkit for Sparkplug Producer Error Model. You always need to specify initial data that make sense for your Sparkplug edge node or device.

Many extension methods for Sparkplug Metric Configuration already initialize the ReadData Property at least to the default value for the given data type. This assures that the initial value is valid for that data type, but it still may not be the "right" value for your edge node or device. Some metric configuration extension methods (such as the ReadWriteValue Method) allow you (and force you to) specify the initial data (or just the value) directly as an argument in the method call.

Polling Interval

You can configure how often Rapid Toolkit for Sparkplug polls for the data, using the PublishingInterval Property on the edge node and each device.

Setting the PublishingInterval Property property to Timeout.Infinite (-1) disables the periodic polling, and effectively switches to Rapid Toolkit for Sparkplug Custom Data Provision Model.

The way the polling interval is configured is the same in the pull and push data consumption models. For a code example (although with the pull data provision model), see Examples - Sparkplug Edge Node - Set polling interval.

Starting and Stopping

The data collection that your code performs may need to be started and stopped together with the edge node. To achieve this, you can tie it to the Starting and Stopped events of the edge node, device, or metric object. The following example illustrates this approach.

.NET

// This example shows how to react to events in order to initiate and finalize data collection in the push data provision
// model.
//
// You can use any Sparkplug application, including our SparkplugCmd utility and the SparkplugApplicationConsoleDemo
// program, to subscribe to the edge node data. 
//
// Find all latest examples here: https://opclabs.doc-that.com/files/onlinedocs/OPCLabs-ConnectivityStudio/Latest/examples.html .
// Sparkplug examples in C# on GitHub: https://github.com/OPCLabs/Examples-ConnectivityStudio-CSharp .
// Missing some example? Ask us for it on our Online Forums, https://www.opclabs.com/forum/index ! You do not have to own
// a commercial license in order to use Online Forums, and we reply to every post.

using OpcLabs.EasySparkplug;
using System;
using Timer = System.Timers.Timer;

namespace SparkplugDocExamples.EdgeNode._SparkplugMetric
{
    class Starting_Stopped
    {
        static public void Main1()
        {
            // Note that the default port for the "mqtt" scheme is 1883.
            var hostDescriptor = new SparkplugHostDescriptor("mqtt://localhost");

            // Instantiate the edge node object and hook events.
            var edgeNode = new EasySparkplugEdgeNode(hostDescriptor, "easyGroup", "easySparkplugDemo");
            edgeNode.SystemConnectionStateChanged += (sender, eventArgs) =>
            {
                // Display the new connection state (such as when the connection to the broker succeeds or fails).
                Console.WriteLine($"{nameof(EasySparkplugEdgeNode.SystemConnectionStateChanged)}: {eventArgs}");
            };

            // Create a read-only data metric.
            var metric = SparkplugMetric.CreateIn(edgeNode, "ReadThisMetric")
                .ValueType<int>()
                .Writable(false);

            metric.Starting += (sender, args) =>
            {
                // Create a timer for pushing the data to the metric. In a real edge node or device, the activity may also come
                // from other sources.
                var timer = new Timer
                {
                    Interval = 1000,    // 1 second
                    AutoReset = true,
                };

                // Set the read data of the metric to a random value whenever the timer interval elapses.
                // Note that this example shows the basic concept, however there is also an UpdateReadData method that
                // can be used in most cases to achieve slightly more concise code.
                var random = new Random();
                timer.Elapsed += (s, a) =>
                    metric.ReadData = new SparkplugData(random.Next(), DateTime.UtcNow);

                // Associate the timer with the data variable.
                metric.State = timer;

                timer.Start();
            };
            metric.Stopped += (sender, args) =>
            {
                // Obtain the timer associated with the metric.
                var timer = (Timer)((SparkplugMetric)sender).State;

                // Stop the timer.
                timer.Stop();
            };


            // Start the edge node.
            Console.WriteLine("The edge node is starting...");
            edgeNode.Start();

            Console.WriteLine("The edge node is started.");
            Console.WriteLine();

            // Let the user decide when to stop.
            Console.WriteLine("Press Enter to stop the edge node...");
            Console.ReadLine();

            // Stop the edge node.
            Console.WriteLine("The edge node is stopping...");
            edgeNode.Stop();

            Console.WriteLine("The edge node is stopped.");
        }
    }
}
' This example shows how to react to events in order to initiate and finalize data collection in the push data provision
' model.
'
' You can use any Sparkplug application, including our SparkplugCmd utility and the SparkplugApplicationConsoleDemo
' program, to subscribe to the edge node data.
'
' Find all latest examples here: https://opclabs.doc-that.com/files/onlinedocs/OPCLabs-ConnectivityStudio/Latest/examples.html .
' Sparkplug examples in C# on GitHub: https://github.com/OPCLabs/Examples-ConnectivityStudio-CSharp .
' Missing some example? Ask us for it on our Online Forums, https://www.opclabs.com/forum/index ! You do not have to own
' a commercial license in order to use Online Forums, and we reply to every post.

Imports OpcLabs.EasySparkplug
Imports Timer = System.Timers.Timer

Namespace Global.SparkplugDocExamples.EdgeNode._SparkplugMetric
    Class Starting_Stopped
        Public Shared Sub Main1()
            ' Note that the default port for the "mqtt" scheme is 1883.
            Dim hostDescriptor = New SparkplugHostDescriptor("mqtt://localhost")

            ' Instantiate the edge node object and hook events.
            Dim edgeNode = New EasySparkplugEdgeNode(hostDescriptor, "easyGroup", "easySparkplugDemo")
            AddHandler edgeNode.SystemConnectionStateChanged,
                Sub(sender, eventArgs)
                    ' Display the new connection state (such as when the connection to the broker succeeds or fails).
                    Console.WriteLine($"{NameOf(EasySparkplugEdgeNode.SystemConnectionStateChanged)}: {eventArgs}")
                End Sub

            ' Create a read-only data metric.
            Dim metric = SparkplugMetric.CreateIn(edgeNode, "ReadThisMetric") _
                .ValueType(Of Integer)() _
                .Writable(False)

            AddHandler metric.Starting,
                Sub(sender, args)
                    ' Create a timer for pushing the data to the metric. In a real edge node or device, the activity may also come
                    ' from other sources.
                    Dim timer = New Timer With
                    {
                        .Interval = 1000, ' 1 second
                        .AutoReset = True
                    }

                    ' Set the read data of the metric to a random value whenever the timer interval elapses.
                    ' Note that this example shows the basic concept, however there is also an UpdateReadData method that
                    ' can be used in most cases to achieve slightly more concise code.
                    Dim random = New Random()
                    AddHandler timer.Elapsed,
                        Sub(s, a)
                            metric.ReadData = New SparkplugData(random.Next(), DateTime.UtcNow)
                        End Sub

                    ' Associate the timer with the data variable.
                    metric.State = timer

                    timer.Start()
                End Sub
            AddHandler metric.Stopped,
                Sub(sender, args)
                    ' Obtain the timer associated with the metric.
                    Dim timer = CType(CType(sender, SparkplugMetric).State, Timer)

                    ' Stop the timer.
                    timer.Stop()
                End Sub


            ' Start the edge node.
            Console.WriteLine("The edge node is starting...")
            edgeNode.Start()

            Console.WriteLine("The edge node is started.")
            Console.WriteLine()

            ' Let the user decide when to stop.
            Console.WriteLine("Press Enter to stop the edge node...")
            Console.ReadLine()

            ' Stop the edge node.
            Console.WriteLine("The edge node is stopping...")
            edgeNode.Stop()

            Console.WriteLine("The edge node is stopped.")
        End Sub
    End Class
End Namespace


Sparkplug is a trademark of Eclipse Foundation, Inc. "MQTT" is a trademark of the OASIS Open standards consortium. Other related terms are trademarks of their respective owners. Any use of these terms on this site is for descriptive purposes only and does not imply any sponsorship, endorsement or affiliation.

See Also